
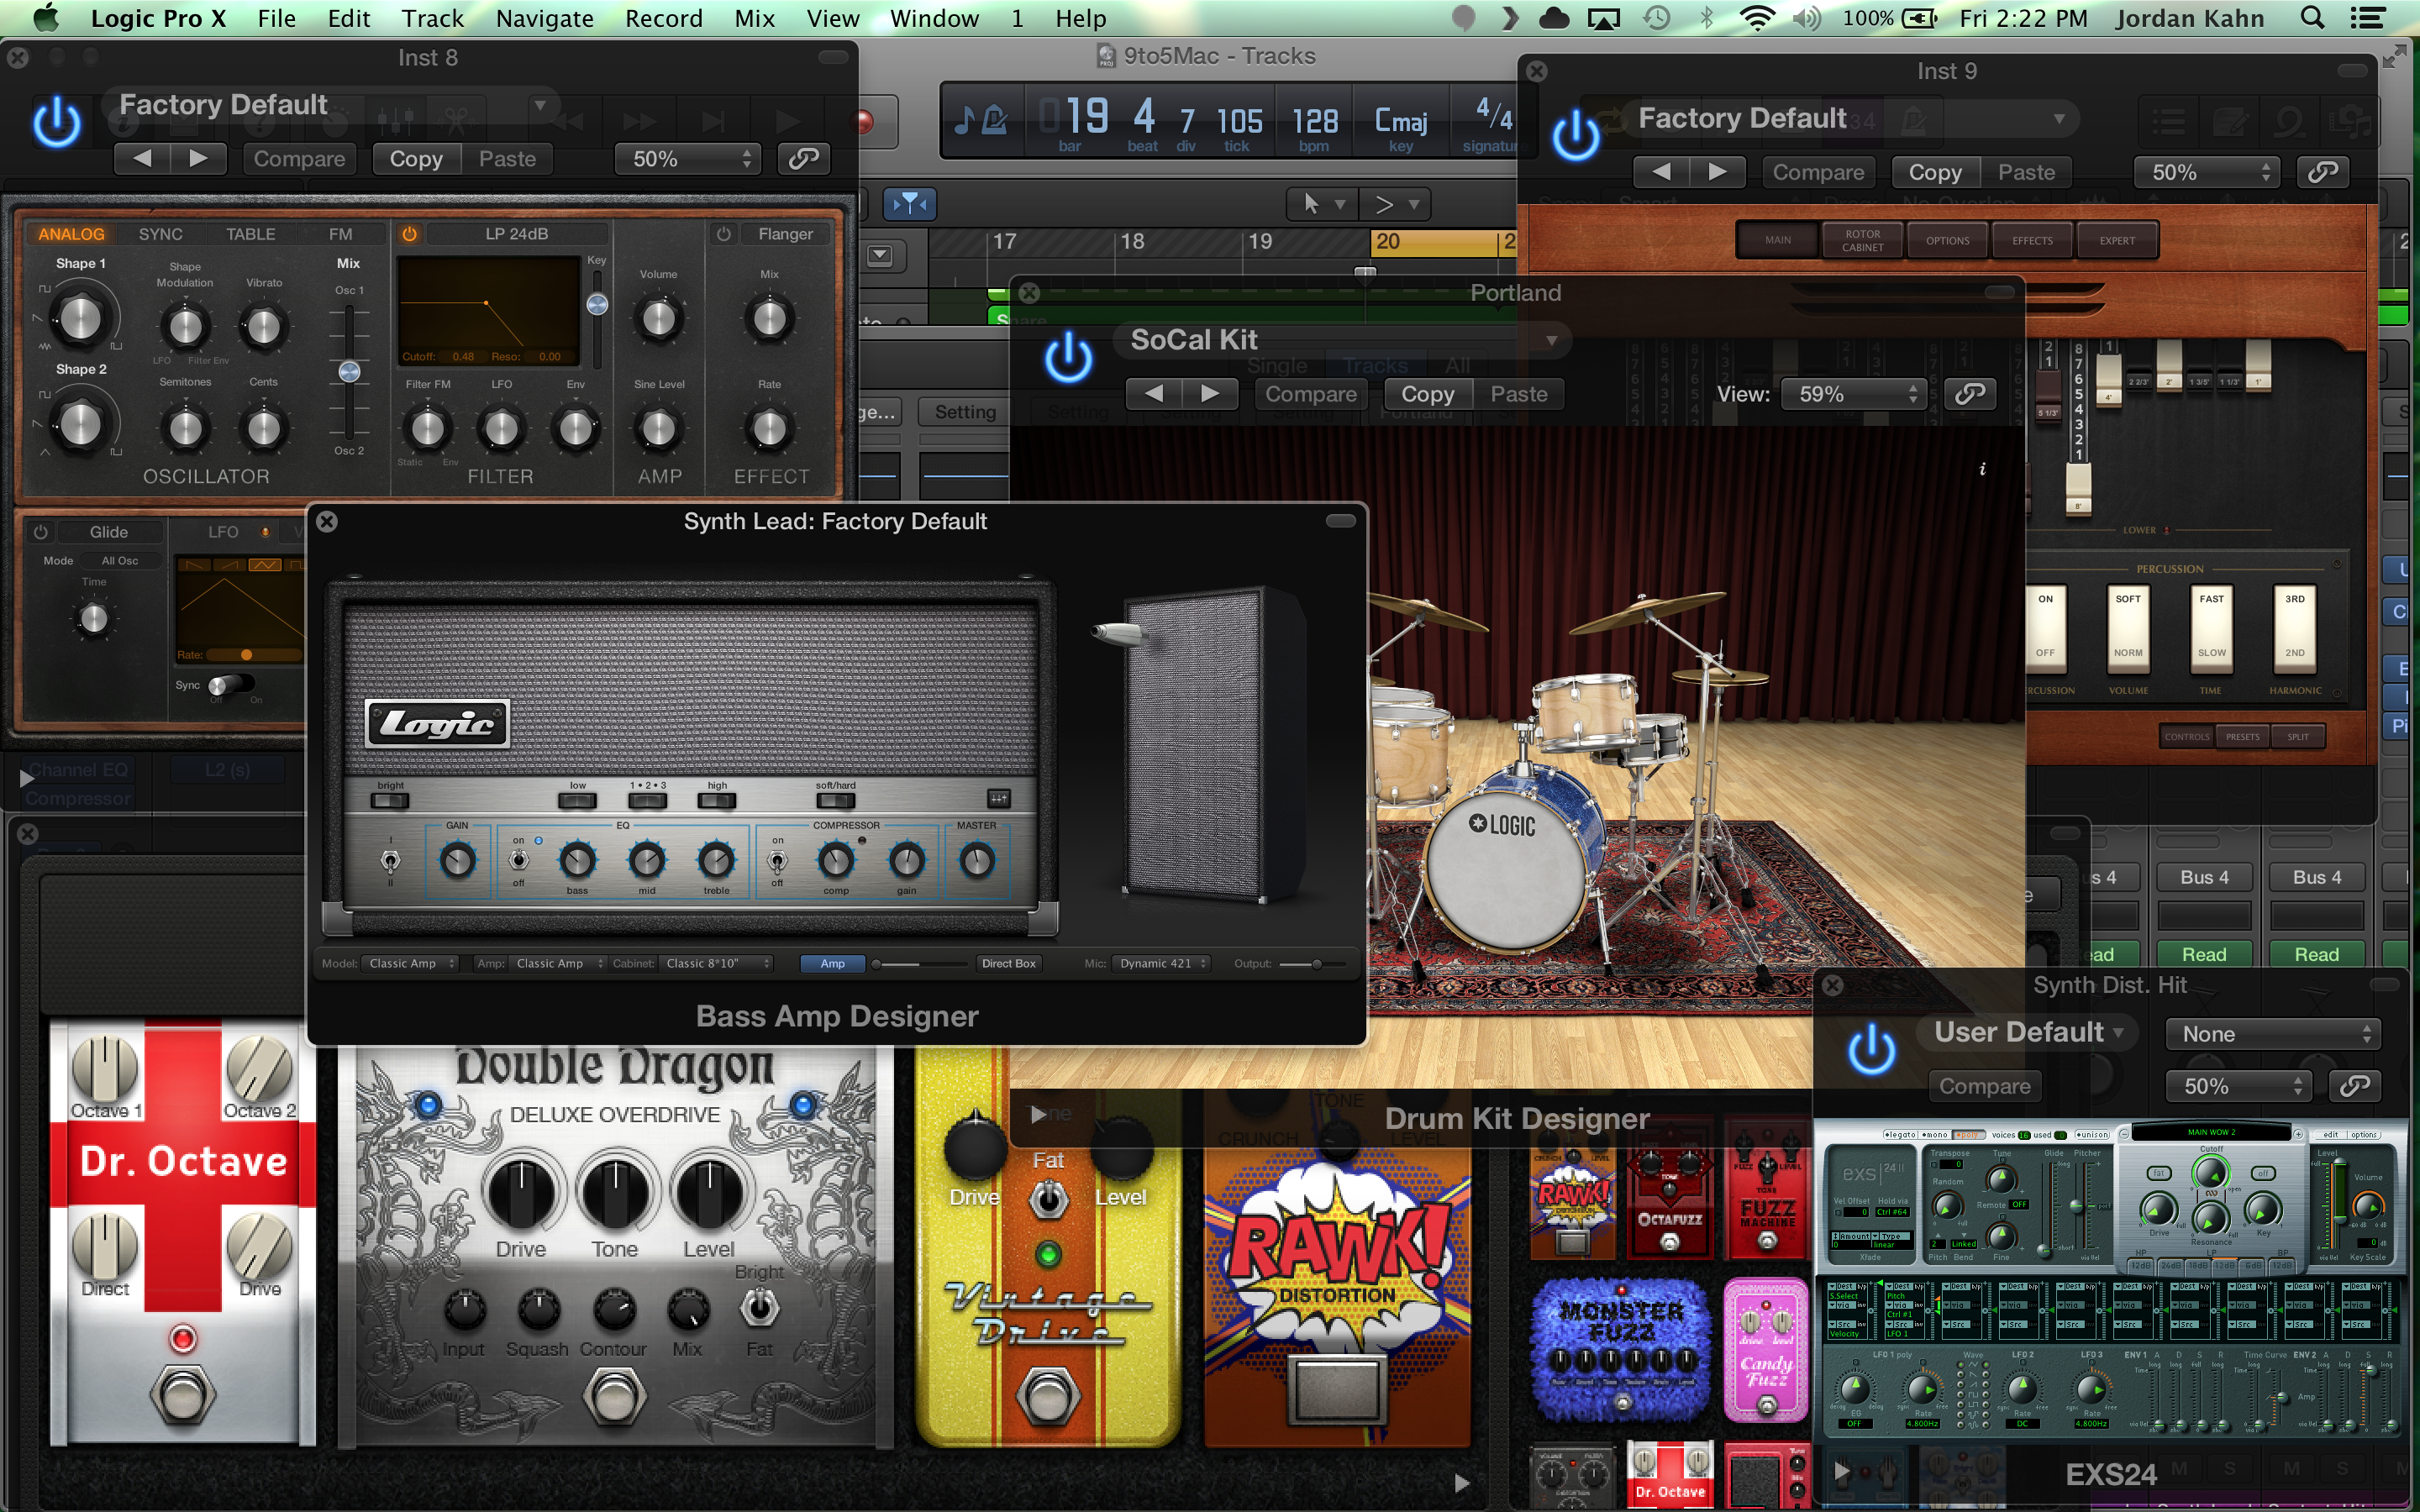
Особенности[]
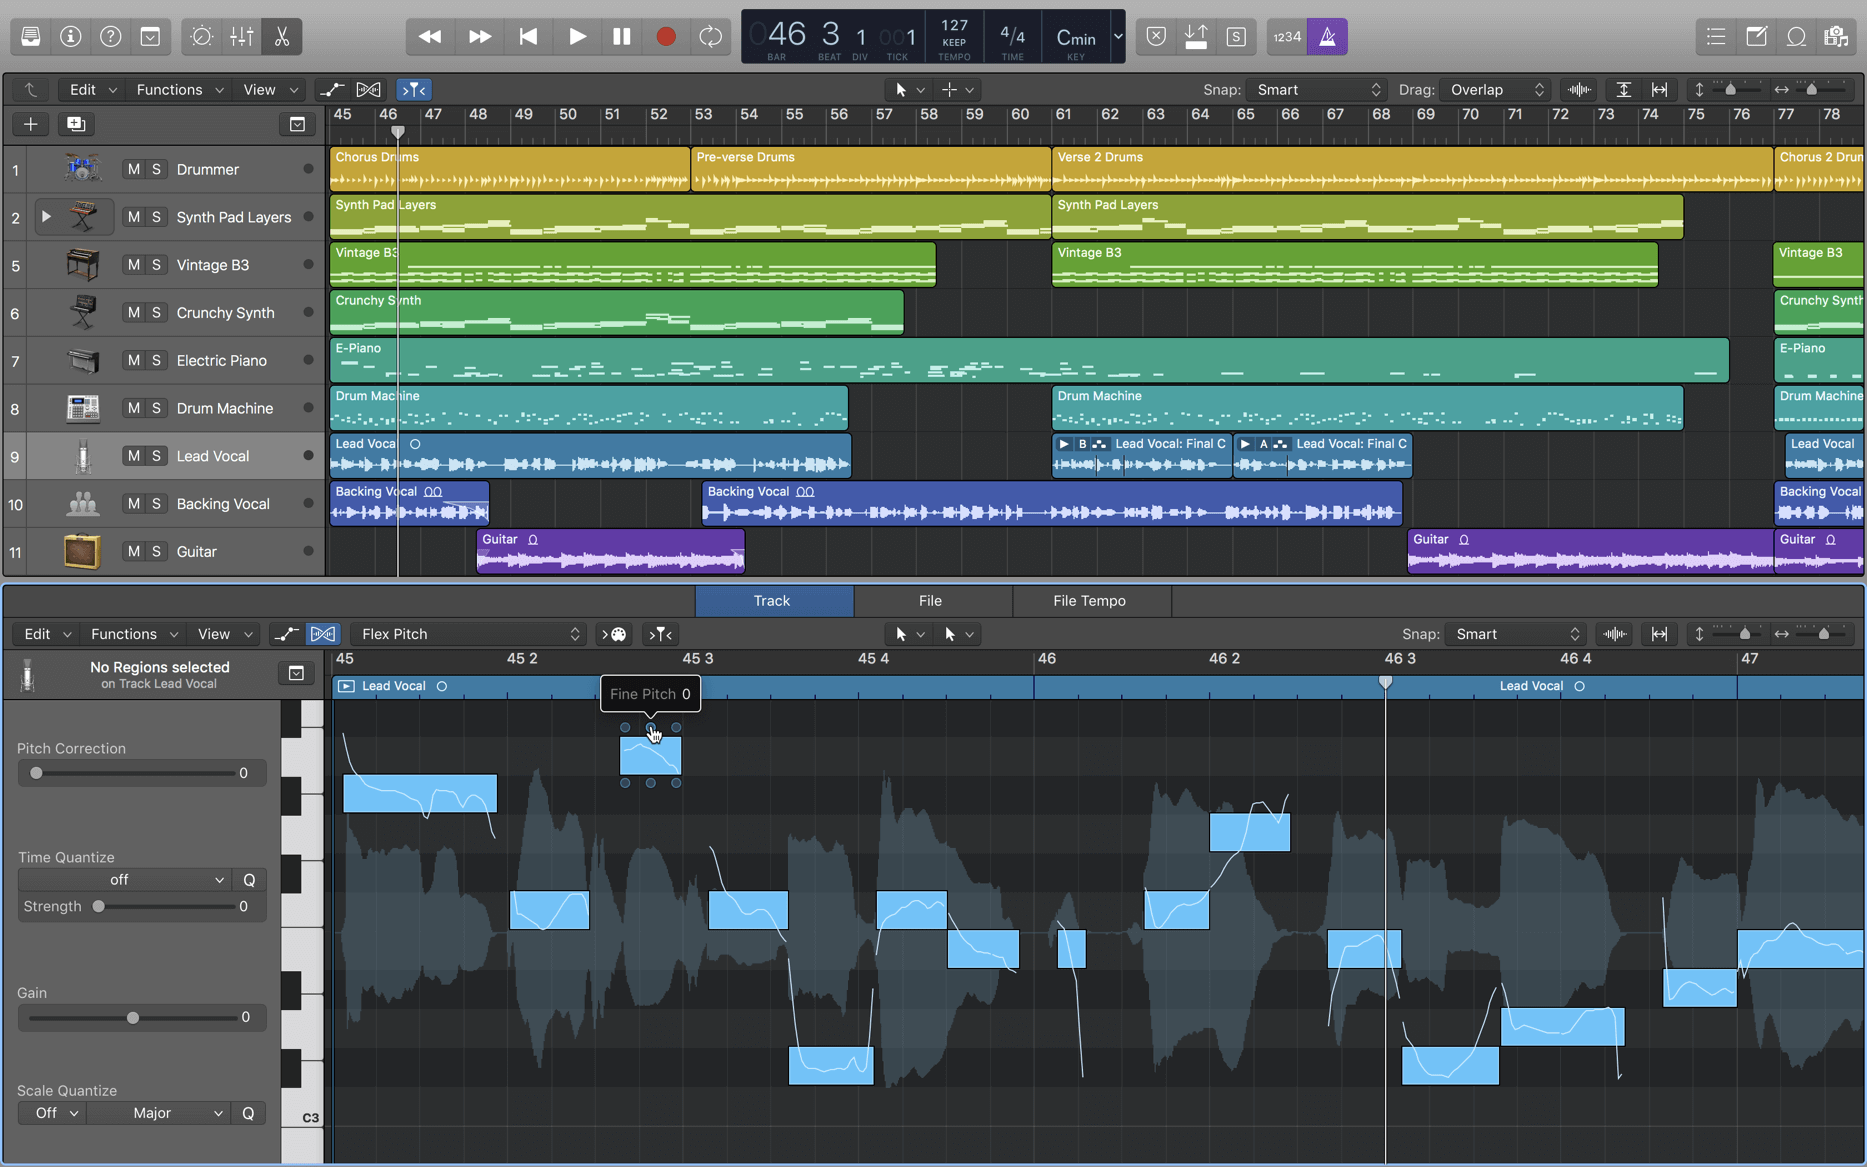
Начиная с версии 10.x.x Logic содержит в своем наборе, инструмент графической «питч» коррекции под названием Flex Pitch, имеющий равную функциональность с VariAudio, входящего в состав Steinberg Cubase, но различается в управлении. Десятая версия, предложила совершенно новый пользовательский интерфейс. Выполненный в тёмных тонах, в целом оптимизирован для работы на дисплеях высокого разрешения. Для комфортной работы требуется по меньшей мере дисплей с разрешающей способностью не менее 1280x 800 px. Одной из отличительных особенностей Logic Pro X версии является отсутствие поддержки 32-х разрядных VST, поддерживаются только 64-х разрядные. Тем не менее возможность использования 32-х битных плагинов, может быть реализована с помощью специальных модулей от сторонних фирм разработчиков. Поддерживаемые языки в интерфейсе Logic Pro X: английский, испанский, китайский, немецкий, французский, японский.
Версия 10.0.7
Нововведения Logic Pro X версии 10.0.7:
- На 12-ядерных моделях Mac Pro теперь поддерживаются 24 потока обработки.
- Текущие значения громкости, панорамы и сенд-эффектов для всех выбранных дорожек теперь можно вставить в точке указателя воспроизведения.
- Включение режима малой латентности теперь не приводит к проблемам синхронизации Drummer, Ultrabeat, Native Instruments Machine и других плагинов со встроенными пошаговыми секвенсорами.
- Теперь можно скопировать автоматизацию и вставить её в любое место, используя инструмент рамки.
- Добавлен вариант, при котором данные громкости и панорамы MIDI управляют плагином-инструментом, а не полосой канала.
- Исправлен ряд ошибок, связанных с привязкой и направляющими линиями.
- Внесены исправления, улучшающие импорт и экспорт данных XML в Final Cut Pro X.
- Добавлены многочисленные улучшения функций универсального доступа.
Версия 10.1.1
Начиная с версии 10.1.0, прекращена поддержка OS X 10.8.x. Теперь для установки и работы программы, требуется OS X 10.9.2 и выше.
Версия 10.2
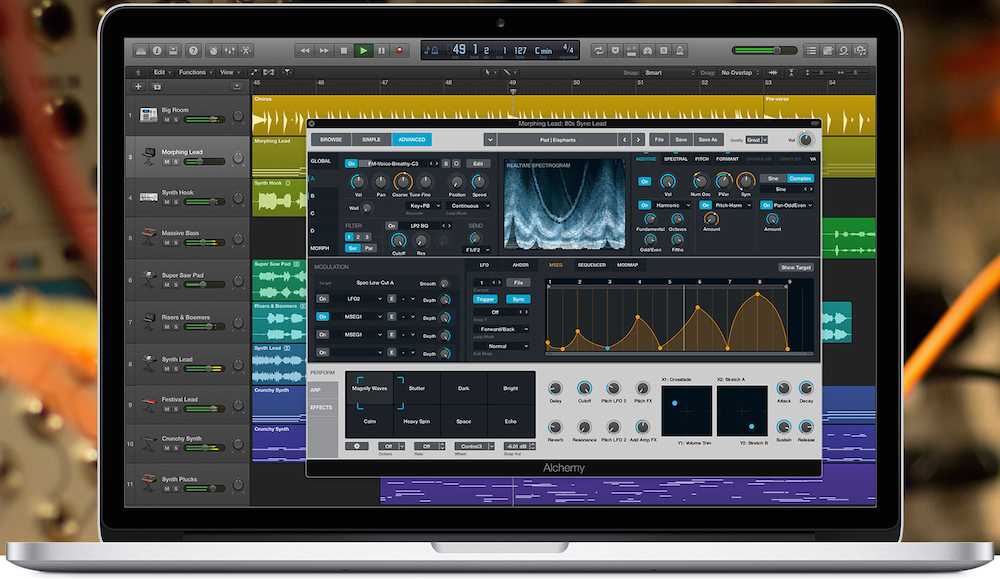
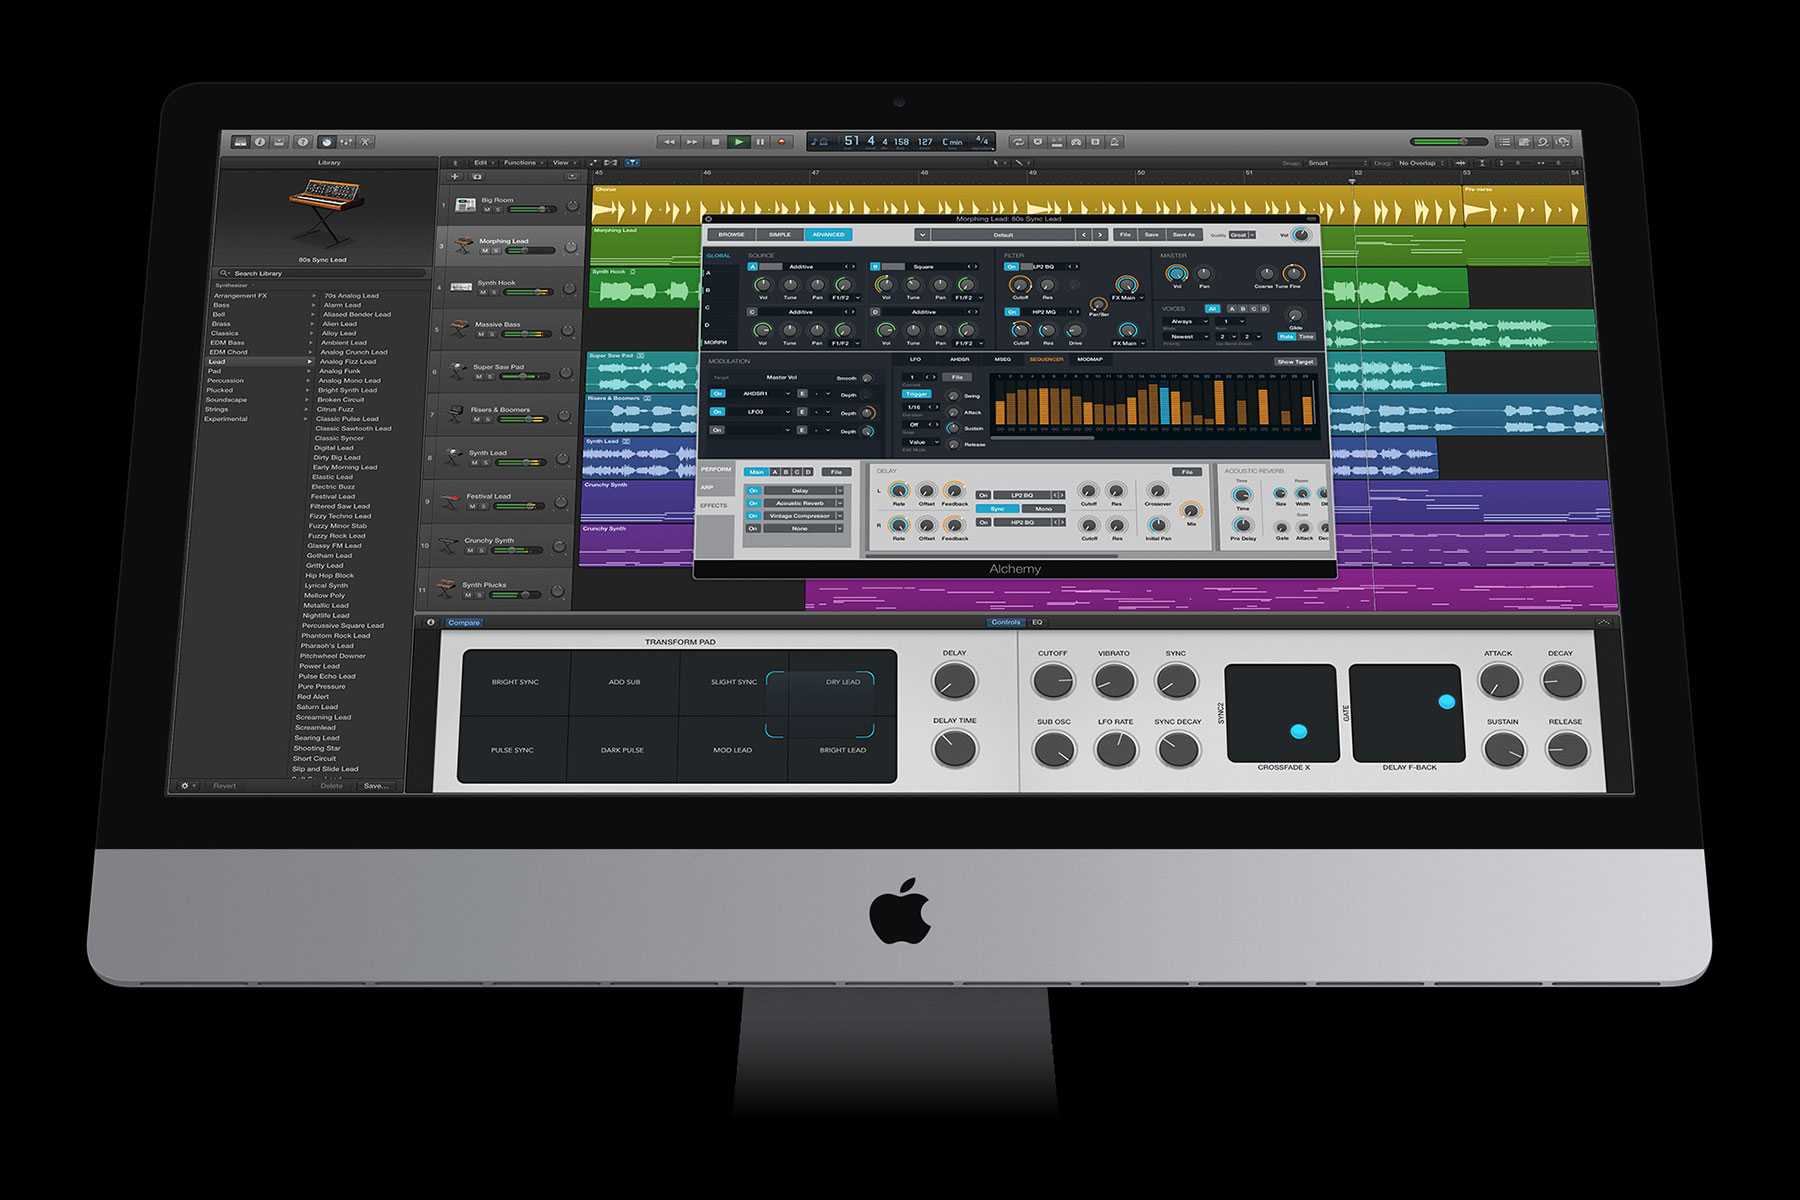
25 августа 2015 года в Appstore, стала доступной новая версия Logic Pro X 10.2. Обновленная версия содержит в себе совершенно новый инструмент для манипуляций с семплами Alchemy. Библиотека размером 14 ГБ. В Logic Pro X 10.2 добавлена поддержка трекпада Force Touch .
Создание вашего инструмента сэмплера:
После того, как вы внесли необходимые корректировки в свой предстоящий инструмент сэмплера, вы просто нажимаете кнопку сэмплирования в нижнем правом углу, и Auto Sampler начинает делать ваш инструмент. Где Auto Sampler сохраняет инструменты? Где вы найдете инструменты Auto Sampler? И как редактировать инструменты Auto Sampler после факта были мои первые вопросы. Вот краткое изложение того, как это работает:
После того как Auto Sampler завершит обработку вашего инструмента сэмплера, вам будет предложено сохранить новый инструмент.
По умолчанию он сохраняет приложения Audio Music Apps> Sampler Instruments> Auto Sampled instruments в виде файла .exs.
Это, в свою очередь, позволяет загружать новый инструмент сэмплера в Sampler, как и любой другой инструмент сэмплера, доступный в новом флагманском программном инструменте Apple.
По умолчанию он будет доступен в подменю инструментов Auto Sampled через всплывающее меню «Sampler Setting». И теперь, как и любой другой инструмент сэмплера, доступный в Sampler, со всеми его возможностями формирования звука. Разумеется, вы можете сохранять инструменты сэмплированием в любом месте, в том числе пользовательские места хранения библиотеки EXS и вставлять их в свои собственные каталоги инструментов сэмплера.
В то время как вы можете просто перетаскивать звук повсюду в Logic Pro, автоматический анализ Auto Sampler практически любого звука, основанного на программном / аппаратном инструменте, который вы можете придумать, — это нечто совершенно другое. Подобная технология ранее была доступна в MainStage, но это обновленное, автоматизированное устройство для производства приборов, безусловно, является желанным дополнением со стороны Logic Pro.
Это не только великолепный инструмент для быстрого создания мультисэмпловых инструментов из аппаратных синтезаторов и программных канальных полос на основе инструментов, загруженных FX-обработкой, но также он может быть особенно эффективным инструментом для производителей, использующих сеансы LPX. Не у всех есть одинаковые плагины и аппаратные синтезаторы, которые могут делить сеансы DAW раздражающими в лучшем случае и почти невозможными в худшем. Если у коллаборатора нет какого-либо предмета или подключаемого модуля инструментов, используемого в конкретном проекте, Auto Sampler может просто и эффективно преобразовать эти инструменты в универсальные и редактируемые программные инструменты Logic Pro X через новый Sampler.
Нашли ли вы какие-нибудь особенно интересные приложения для Auto Sampler? Или это не то, что когда-либо будет полезно, а скорее будет использовать только то, что у вас есть, а не пробовать его?
Conclusion
Over the years, Apple has done an incredible job providing its users with fantastic professional music software. For $200, you can get all-in-one software with tons of loops, plugins, and virtual instruments, along with different features for all kinds of music production.
We advise you to weigh all the pros and cons that might be crucial for you. Does your budget allow you to purchase this software? Do you have a Mac that is not very old? If yes, then you can safely try this software for yourself. If you already have experience in DAW, learning Logic will be elementary for you.
If you don’t like Logic Pro, you can always find something else. There are plenty of DAWs out there that are cheaper. But if you love it, we don’t exclude that it will become your main thing for a long time.
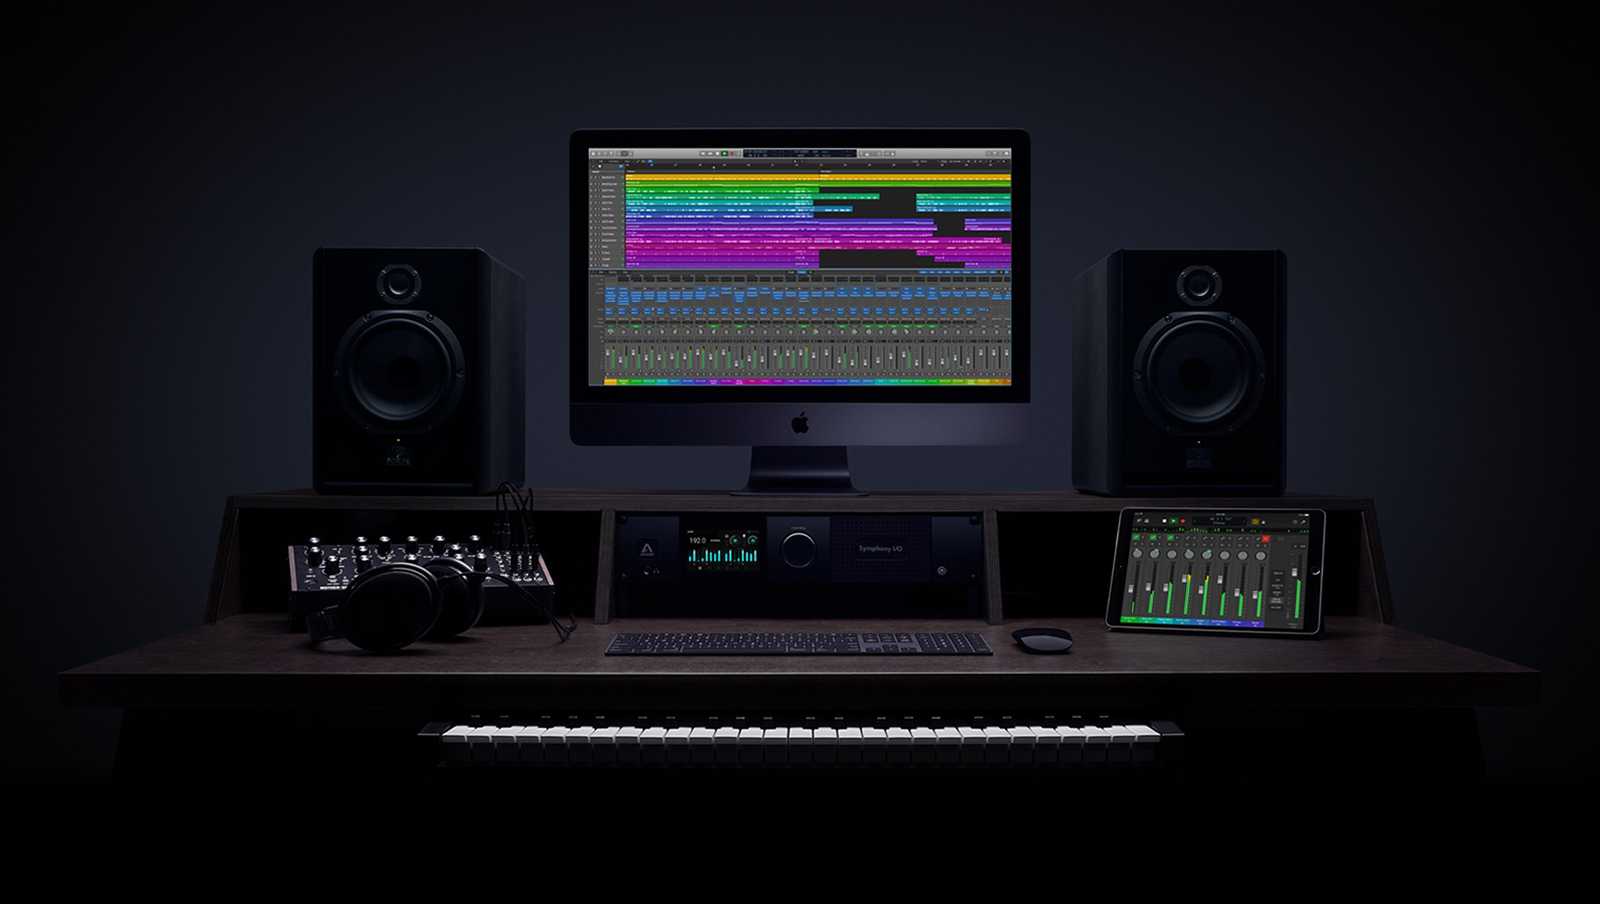
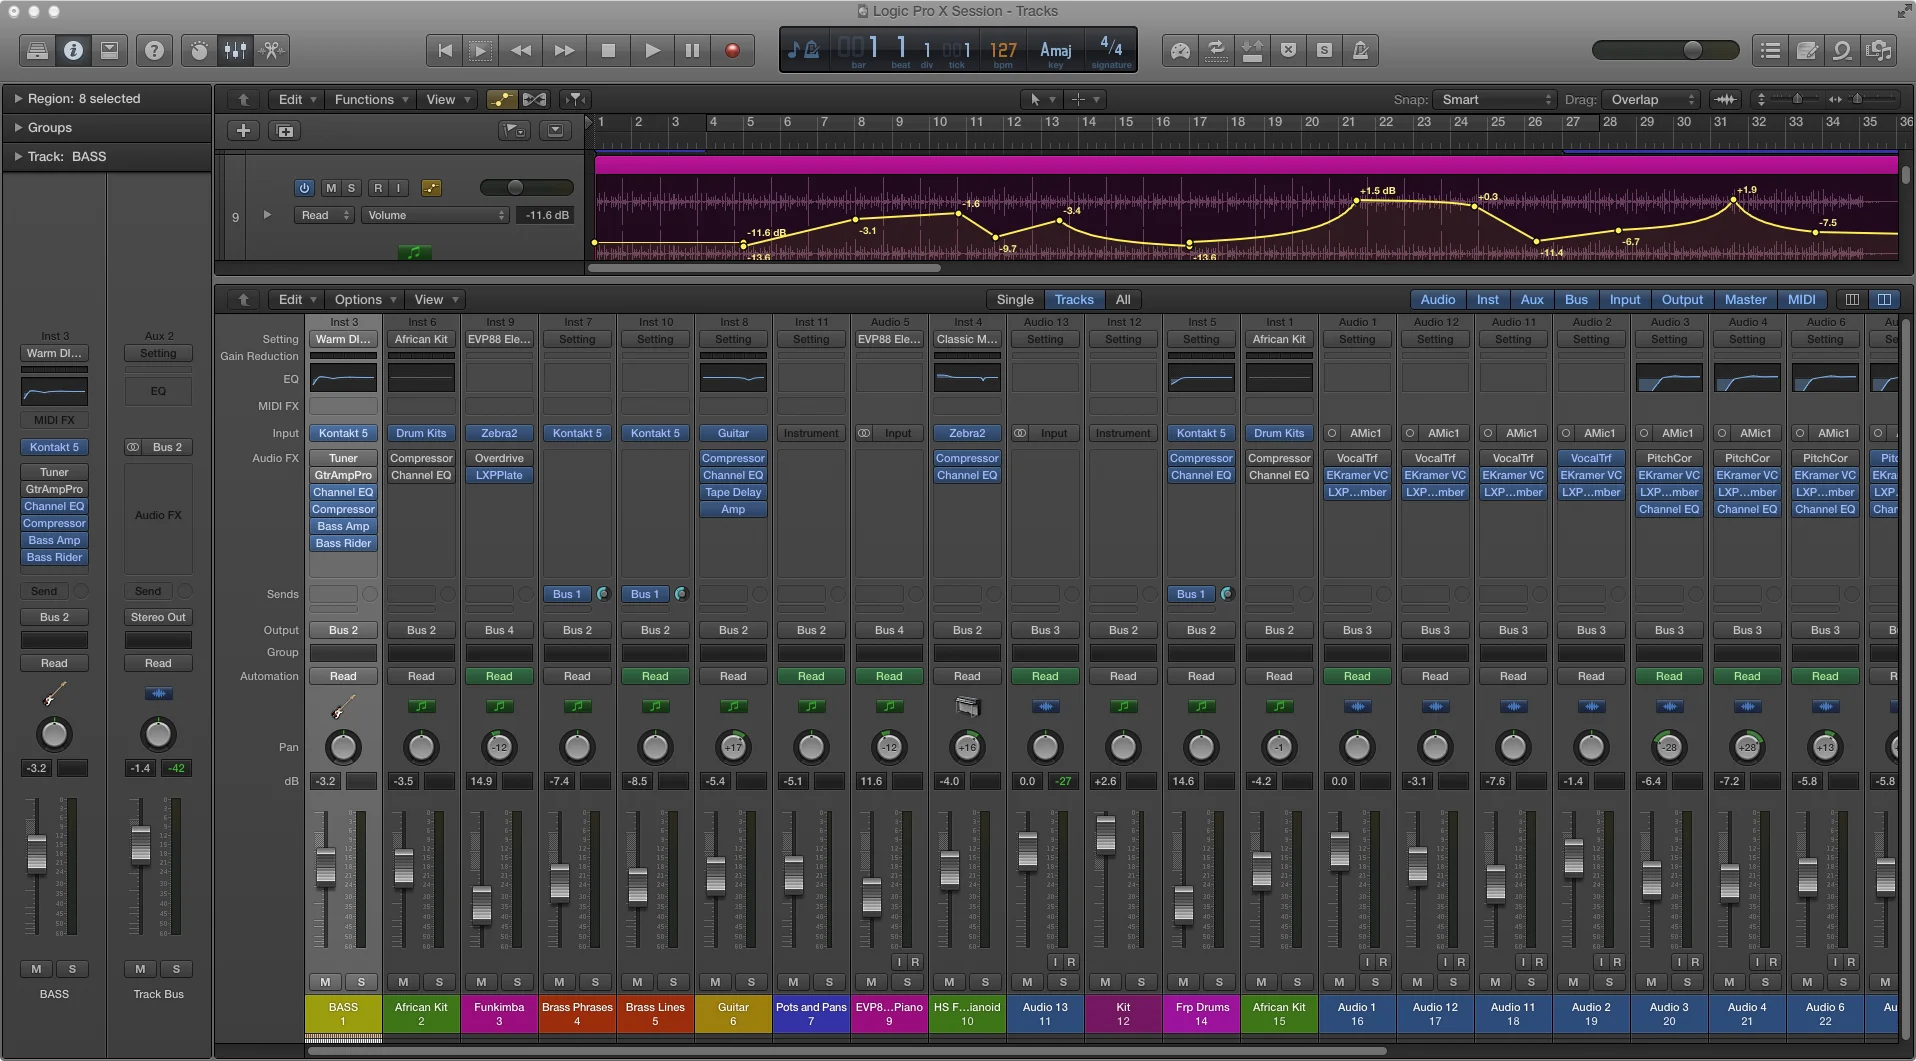
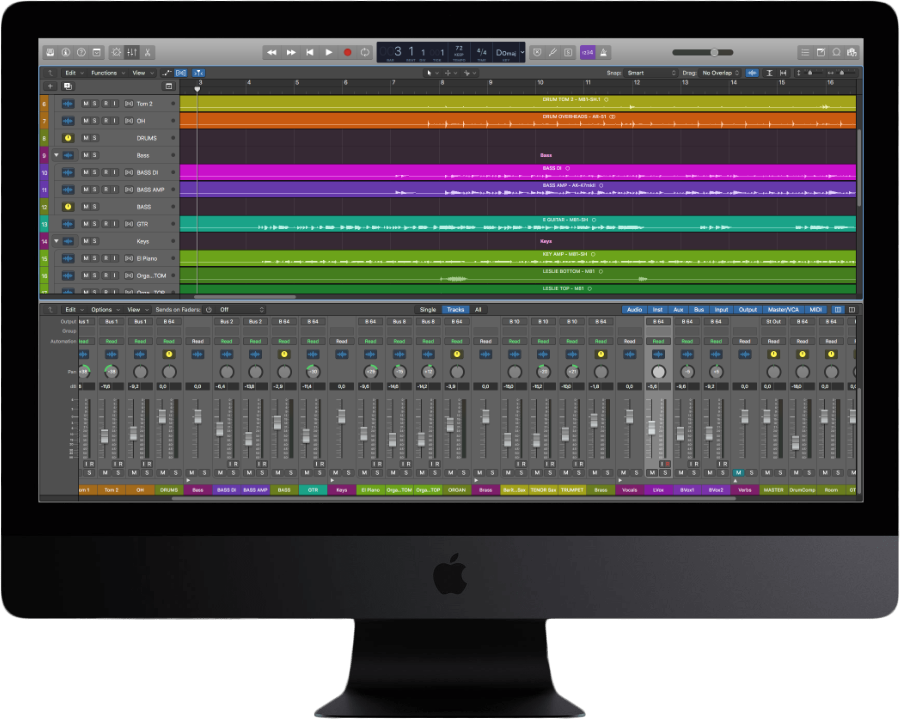
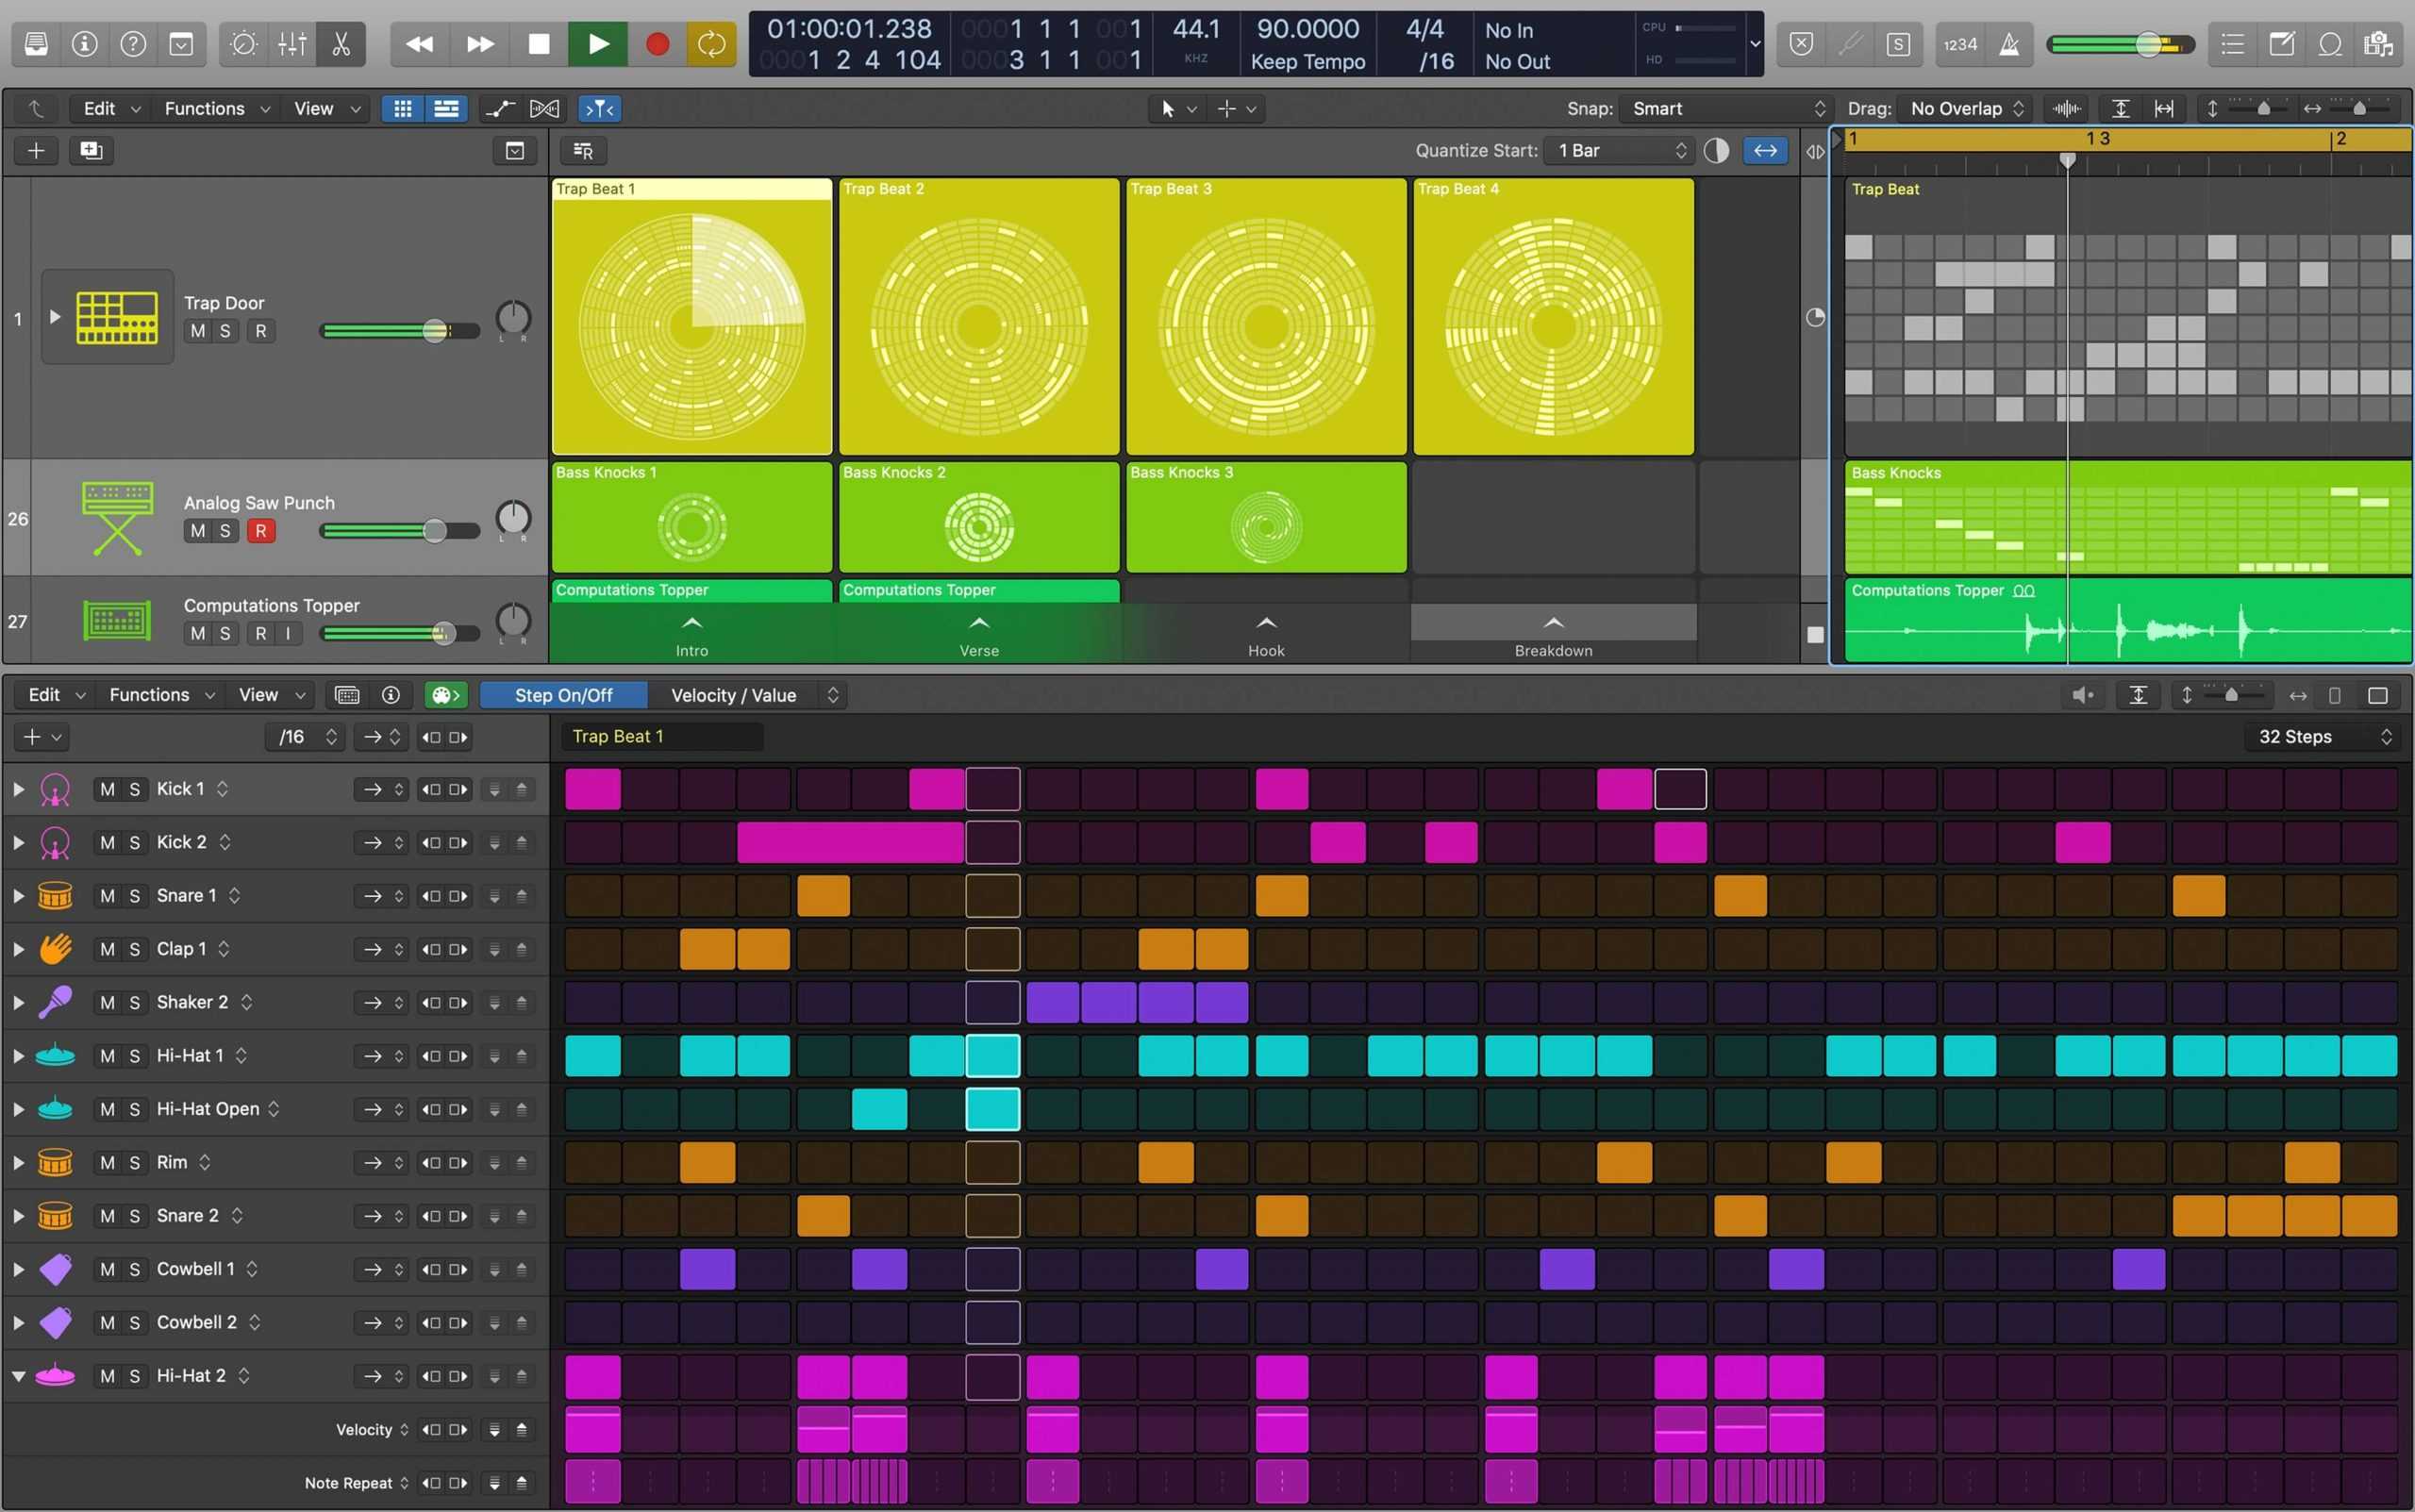
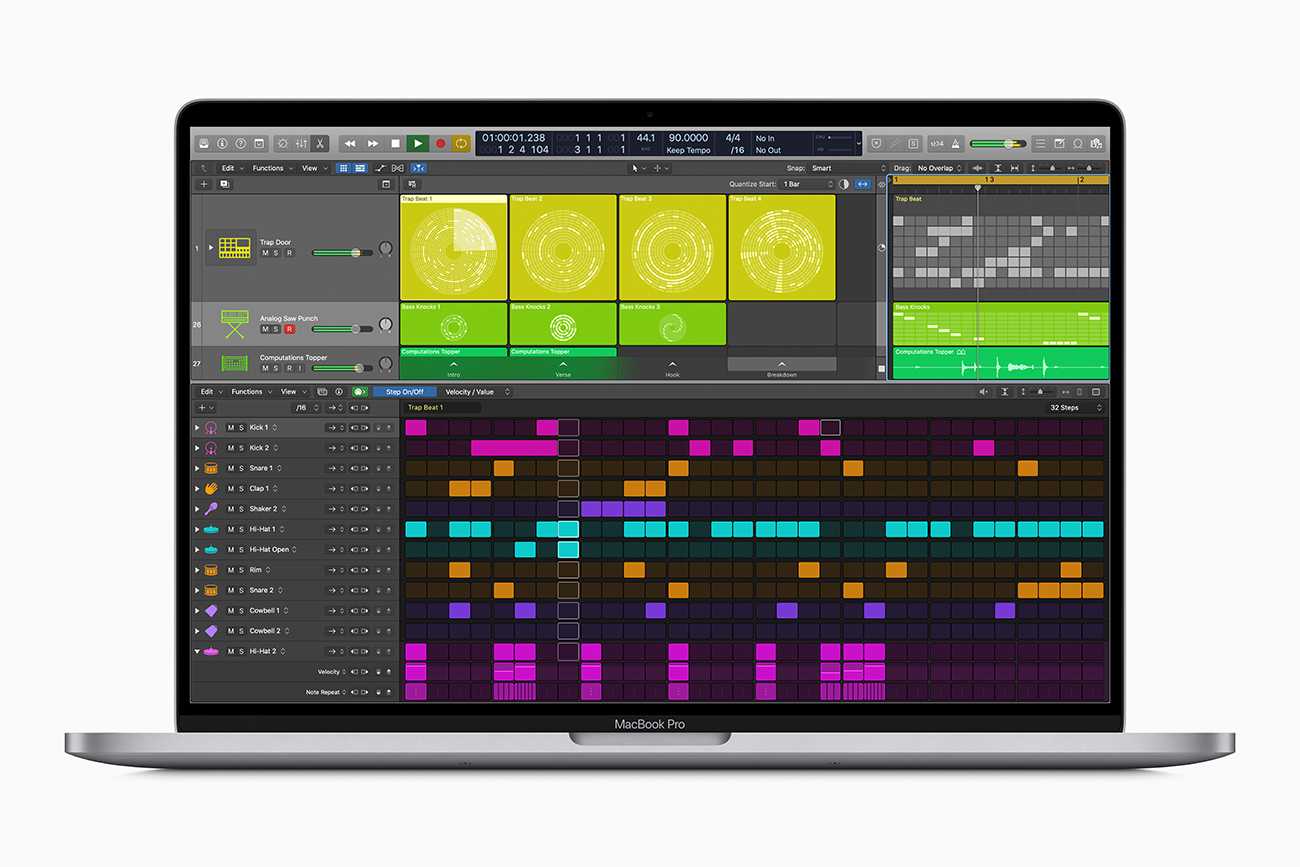
Logic Pro X Канальная линейка
Канальная линейка (Channel Strip).
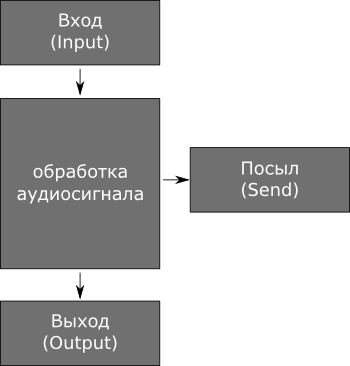
Для начала давайте рассмотрим каким образом протекает сигнал по канальной линейке.
На вход канальной линейки подается аудио сигнал либо сигнал из программного инструмента, затем сигнал подвергается обработке, например, эквалайзером и далее уже обработанный сигнал идет на выход и вы слышите конечный результат.
С помощью кнопки посыла Send можно направить часть сигнала с канальной линейки через виртуальную шину Bus на вспомогательную линейку Aux для обработки сигнала процессорами эффектов. Например, ревербератором. При посыле сигнала на Aux можно регулировать уровень обработанного сигнала и подмешивать его к необработанному. При этом обработанный сигнал и необработанный на выходе суммируются, это влияет на общий уровень сигнала.
Теперь давайте рассмотрим логику движения сигнала, прежде чем вы услышите его в своих наушниках или мониторной акустике:
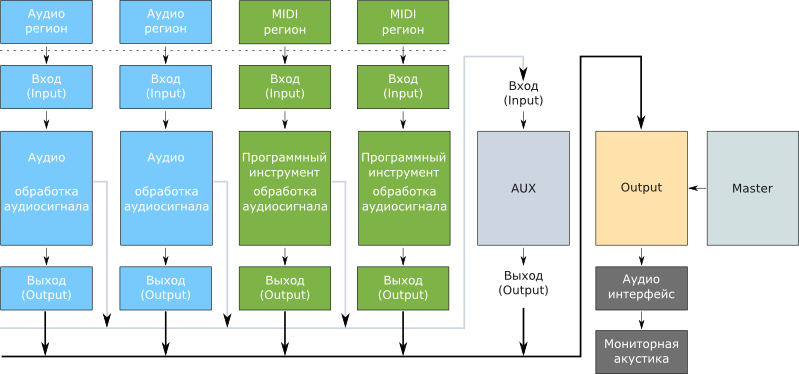
Как видно из диаграммы, выходы со всех канальных линеек поступают на вход выходной канальной линейки Output, а затем на аудио интерфейс и только потом сигнал можно услышать из мониторной акустики или наушников. Весь обработанный сигнал со всех вспомогательных линеек так же поступает на вход Output и суммируется с остальным сигналом.
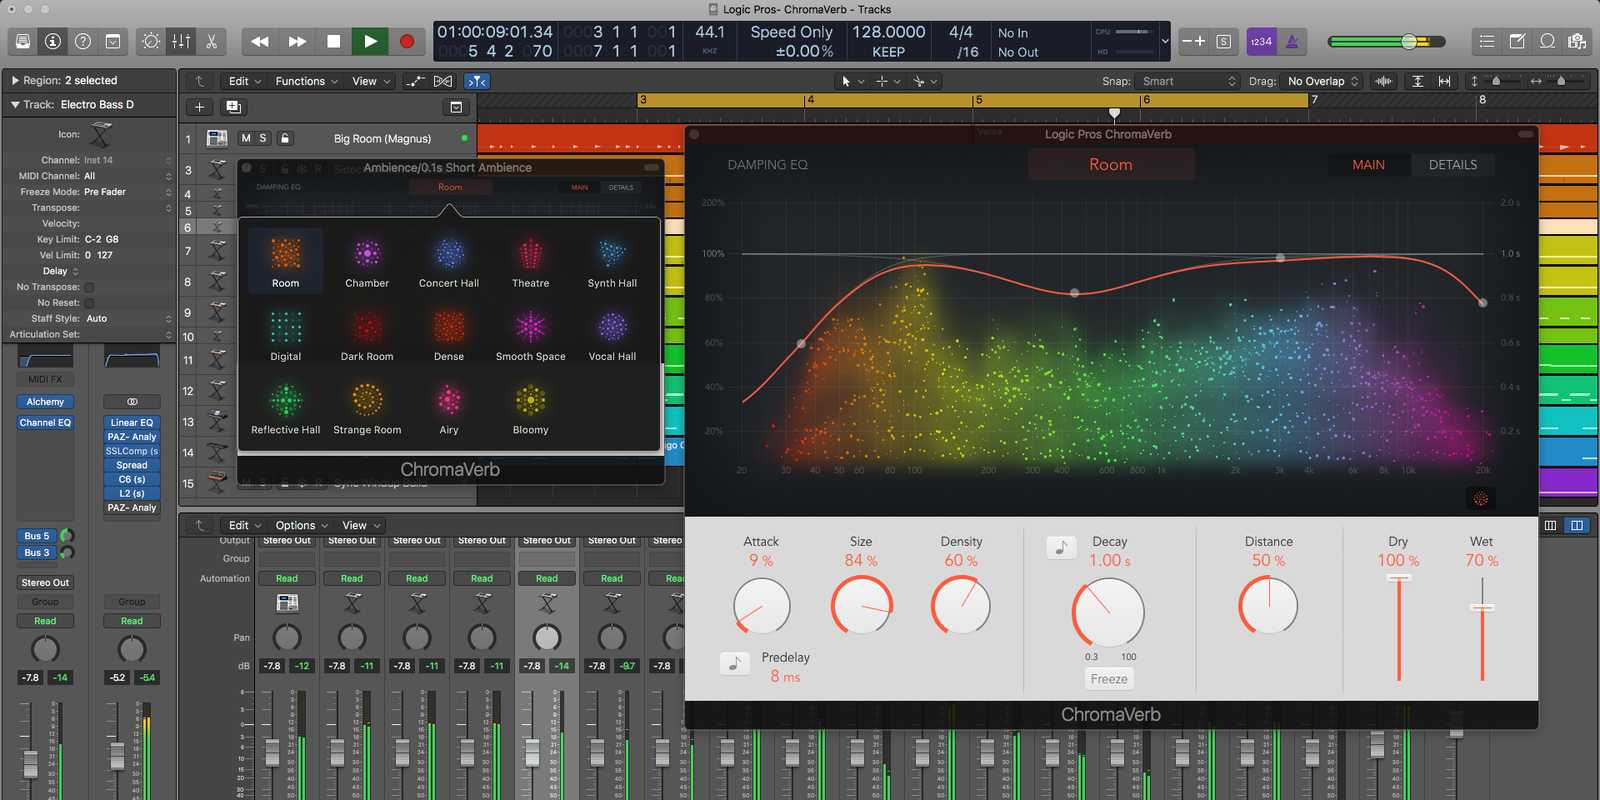
Компоненты канальной линейки.
Канальная линейка состоит из множества компонентов. Некоторые из них скрыты и набор этих компонентов отличается для каждой канальной линейки в зависимости от ее типа. Чтобы увидеть все компоненты нужно кликнуть мышью с зажатой клавишей по канальной линейке и активировать все доступные функции.

Интерфейс авто сэмплера
Интерфейс плагина Auto Sampler — это простой интерфейс, который дает нам возможность настраивать наши новые инструменты сэмплера перед их созданием. Ветераны образцов программного обеспечения будут чувствовать себя как дома благодаря главной панели управления, графическому дисплею и другим параметрам выборки. Некоторые знакомые опции находятся спереди и по центру, включая возможность регулировки количества слоев скорости, которые должны быть сэмплированы, условия зацикливания, диапазон высоты ноты, ноты для сэмплирования в этом диапазоне, и даже интересную функцию «Round Robin» для захвата тональности. вариации (в источниках звука, которые его поддерживают). Для остальных из нас давайте кратко рассмотрим, что у нас есть, и некоторые из наиболее важных элементов пользовательского интерфейса, о которых следует знать:
В разделе клавиатуры вверху, где мы можем установить диапазон образца заметки или диапазон высоты нот, перетаскивая края выделенной области (также доступно через параметры Range Start и End на главной панели управления ниже).
Ниже расположена основная панель управления, где мы настраиваем способ создания нашего инструмента сэмплера. С помощью этих параметров вы, по сути, вносите коррективы в точность инструмента сэмплера и способ обработки звука во время процесса создания, в том числе количество скоростных слоев, длину семпла, параметры зацикливания и многое другое. Вот несколько особенно важных параметров, за которыми нужно следить:
Поле Sample Every и ползунок настраивают интервал между нотами сэмплирования. Примечания, выделенные синим цветом в разделе клавиатуры, представляют собой те, которые фактически будут сэмплированы. Белые заметки между ними будут автоматически заполнены Sampler после факта (подробнее о том, как эта технология работает прямо здесь). Чем больше нот будет выделено синим цветом, тем больше будет моментальных снимков, которые Auto Sampler сделает для создания звука, что приведет к гораздо более длительному времени обработки при создании инструмента. С другой стороны, вы получаете более высокое качество или, точнее, более точное представление источника выборки.
Во всплывающем меню Velocity Layers мы выбираем, сколько скоростных слоев выбрать. Опять же, это все о точности или деталях, с которыми Auto Sampler будет делать моментальные снимки источника, который мы ему даем. Источник должен реагировать на скорость MIDI и записывать сообщения, чтобы это работало. Когда вы делаете выбор здесь, графический дисплей ниже позволит вам точно настроить точки пересечения скоростного слоя. Эта опция также увеличит время обработки с номерами слоев с более высокой скоростью, поскольку вы существенно увеличиваете количество файлов, которые будут созданы и организованы в конечном инструменте.
Не пропустите небольшой флажок One Shot в правом углу интерфейса. Это для случаев, когда вы хотите сделать один удар SFX или ударные удары, которые не зацикливаются (или просто воспроизводятся до конца там при запуске).
Вы также захотите следить за ползунком усиления, расположенным в середине пользовательского интерфейса, чуть ниже графического дисплея. Как правило, перед созданием инструмента рекомендуется быстро убедиться, что ваши сэмплы не выделены красным цветом или обрезаны. Этот ползунок контролирует только уровень входной записи, поступающей в Auto Sampler.
Starting a Mix: Set Your Levels
Opening the Mixer Window and Color Coding Tracks
Before you dive in and start moving faders, you’ll need open up the mixer window using the keyboard shortcut “Command + 2.“ This will give you a nice fullscreen view of the mixer rather than a smaller window inside the arrangement view.
It’s also a great idea to color code your tracks to keep things tidy and easily identifiable. This is especially important the more tracks you have to mix!
For example, you can start making all of your drum/percussion tracks the same color. Make a selection by clicking the first track and dragging to the last one. Open up the color picker using “Option + C” and choose whichever makes the most sense to you!

Part 9: Quick and Easy Drums with Logic Pro’s Drummer
If writing drum parts isn’t your forte, Logic Pro’s Drummer is a great way to get a solid beat for your song in no time at all.
Logic Drummer is a rhythm instrument that comes with premade patterns you can use to spice your song up.
To create a Drummer track, hit the “+” button again and select the “Drummer” on the right.
Drummer is really powerful with plenty of flexibility. The first thing you’ll notice when you open Drummer is the drummer library.
Drummer comes with a bunch of different drummer profiles.
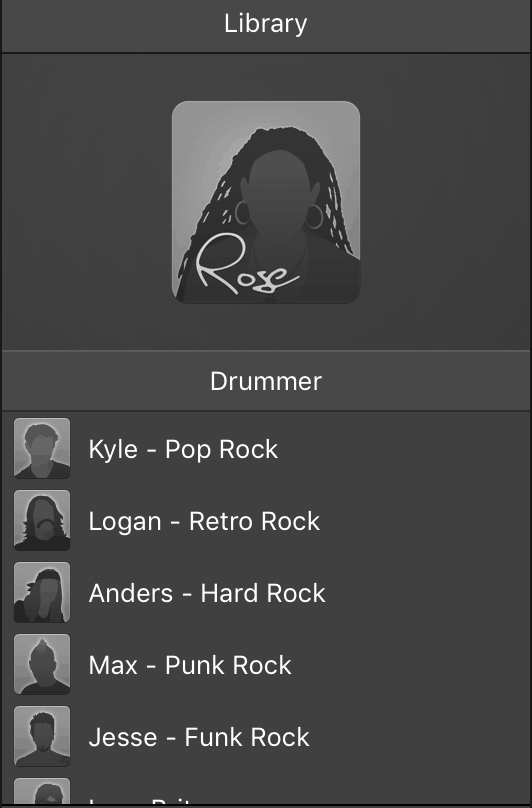
These drummers have personalities and styles. Like Rose who specializes in Modern R&B, or Aiden who plays Indie Pop.
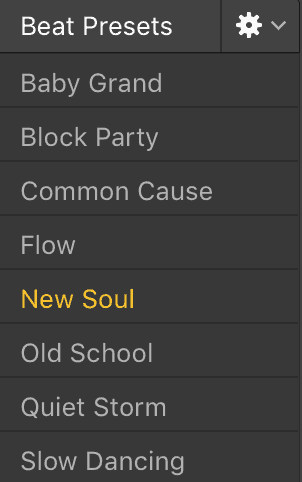
Each drummer also has their own unique patterns. Rose’s patterns are tight and minimalistic, while Aiden’s rhythms are loose and busier. You can cycle through each drummer’s patterns by clicking on the different beat presets.
I’m a big fan of tight drum sounds, so I’ve chosen Rose as my drummer.
Once you’ve picked a drummer, you can change what kit they’re playing.
Right below the list of drummers is a list of drum kits. Listen through all of them and decide which one works for you.
By default, Rose uses the “Slow Jam” kit, but I want a drum kit with a boomier kick. After listening through a few options, I like how the “Roots” kit sounds.
(I also chose this kit because I’m in love with QuestLove. QuestLove, if you’re reading this, call me).
To the right of the beat patterns, you can change the dynamics and complexity of your pattern.
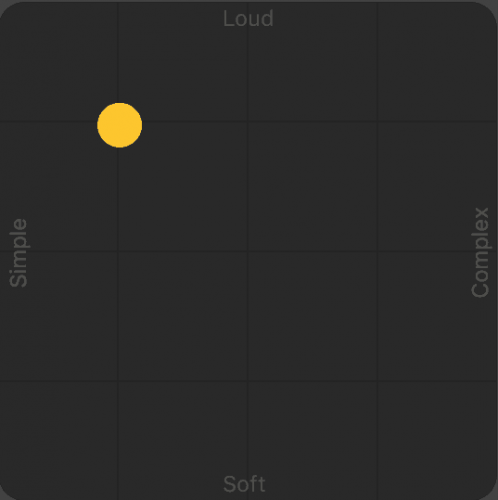
For a simple, quiet rhythm, move the yellow circle down and to the left. If you want a really bombastic part, pull the yellow circle up and to the right.
Making Your Drummer Track Feel More Lifelike
Drummer is a wonderful tool. But if you just keep looping the same pattern, it’ll become obvious that it’s not a real drummer.
Here are a few things you can do to make Drummer sound more like the real thing.
A real drummer won’t play the same pattern throughout the entire song. Using a different pattern for the verse than the chorus is a good way to push the song forward.
You can even make the first half of one section different from the second half. Imagine you have a verse that’s quiet and laid back for the first 8 bars but picks up steam for the second 8.
Press the yellow plus sign to the right of your pattern. This’ll copy the pattern over.

Highlight the 2nd pattern. Then move the yellow circle from the dynamics and complexity grid.
This’ll make a slightly different pattern play during the 2nd half of the verse, building energy.
You can also add occasional fills by turning up the “Fills” knob. Changing the fill knob from pattern to pattern will also add some nice variation to your drum part.
To get more out of Logic Pro’s Drummer, check out this tutorial that covers all of Drummer’s basic features.
Trying to learn to use Logic Pro X? You’re in luck. It may seem complicated right now, but by reading this guide, you’ll learn everything you need to know to turn your ideas into full songs. We’re covering ALL the basics of this incredible DAW. But if you just want to learn about Logic Pro specifica
UPDATE: Here’s a great tutorial on how to make a beat in Logic Pro X:
Trying to learn to use Logic Pro X? You’re in luck. It may seem complicated right now, but by reading this guide, you’ll learn everything you need to know to turn your ideas into full songs. We’re covering ALL the basics of this incredible DAW. But if you just want to learn about Logic Pro specifica
Power Failure
You know that scene in teenage coming-of-age movies where the parents open the front door just when the kid’s party is in full steam? Invariably, you’ll hear the sound of the music slowly dying down as if the power has been shut off. There are several ways to create this effect, but Logic has some tools to streamline the process.
Start by placing the locators from a little before you want the track to start slowing down, and ending where you want the clip to end.
Next, bounce the track as you normally would. Disable any bus processing since this mix will be played in your session (and thus would otherwise be going through the bus processing twice). You could use Bounce In Place at this point but, depending on what plug-ins you are using and where, the results may vary.
Mute the regions you just bounced. Import the audio from your Bounces folder (or the Project Audio List) and place it in its original spot (a tip on this is coming up).
Now right-click on the region and select Convert / Convert To New Sampler Track (or use the appropriate key command). Give it a name and choose a starting trigger note that’s easy to get to on your keyboard. Select OK. Logic will create a track with a new EXS24 instrument. When you hit the trigger key that you chose, you should hear the portion of the song you originally selected. Even better, Logic will automatically create a MIDI region with the sample key already activated.
Mute the bounced audio, open the EXS24 instrument, and change the pitch-bend range to 12. Now you can slow down your track with the Pitch-Bend wheel, and perform it to taste.
This may seem a little convoluted, but explaining the procedure is more time-consuming than the actual execution.
 After bouncing and muting the portion of the song between the locators, create an EXS24 instrument of the bounce (using ‘Convert To New Sampler Track’). Then change the pitch-bend range to 12 and play in the effect.
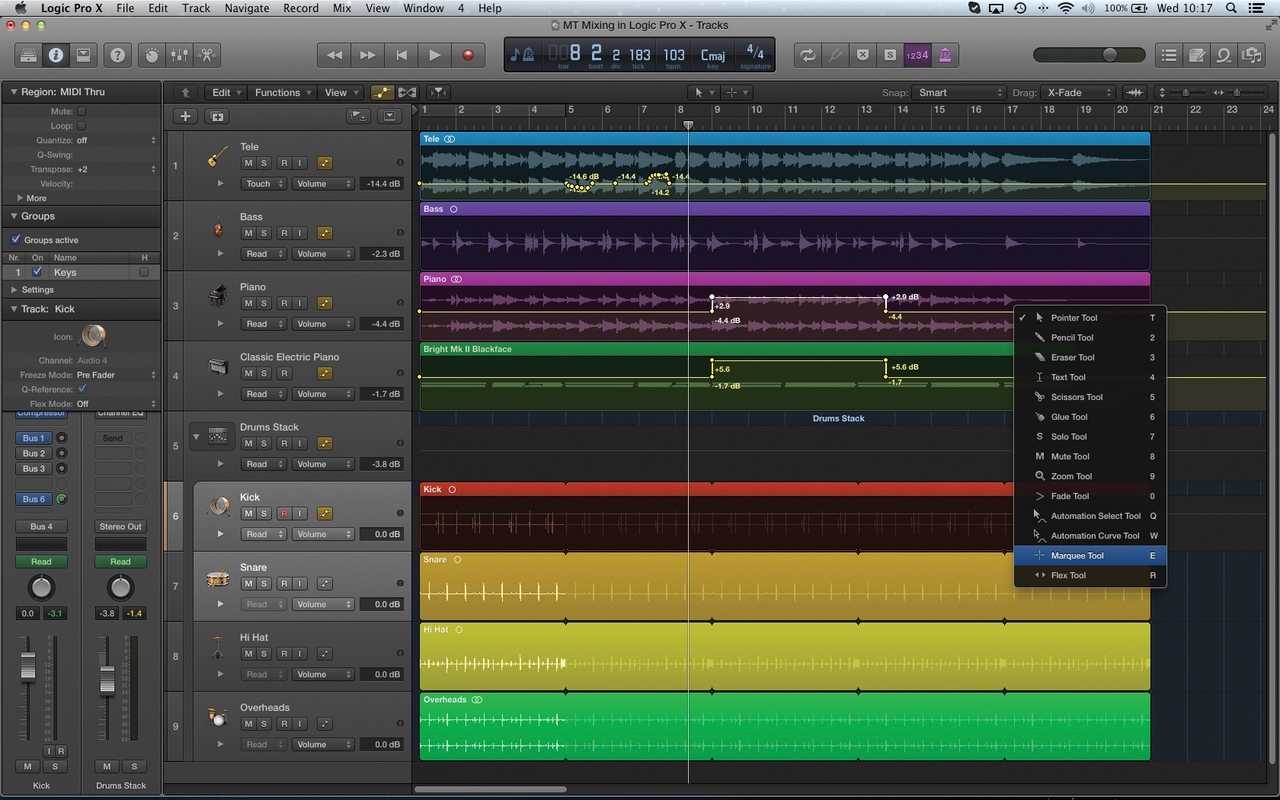

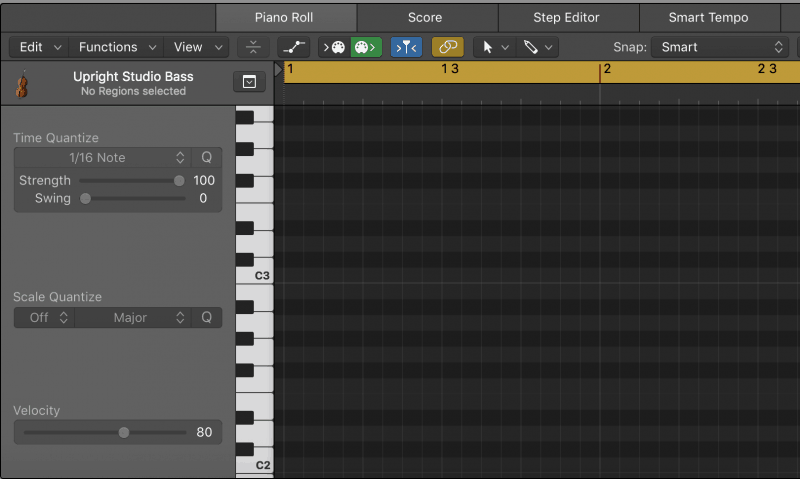
Part 7: Using the MIDI Editor Window
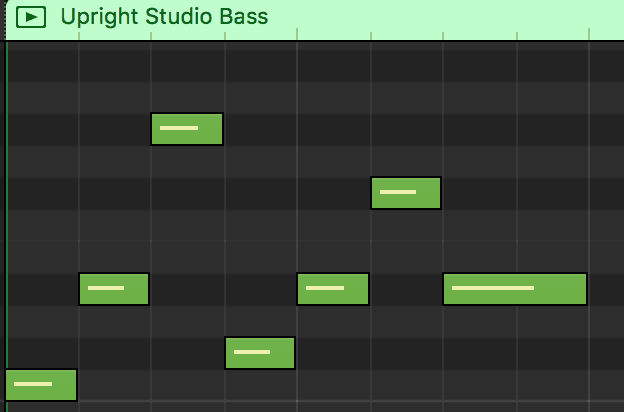
This is the MIDI Editor Window. By default, it shows the Piano Roll, but you can also look at the Score and Step Editor if you prefer to notate with those.
If you want to do any MIDI editing, this is where you’ll usually do it. Here you can add in MIDI notes by hand.
By clicking on the image of a cursor in the editor window (or hitting T on your keyboard), you can select the pencil and eraser tools. These’ll let you add and delete notes.
The brush tool is handy if you want to add a lot of short notes in quick succession.
When the pointer tool is selected, you can move notes around by dragging them up or down.
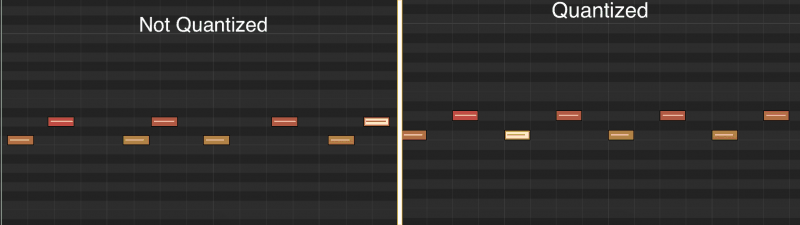
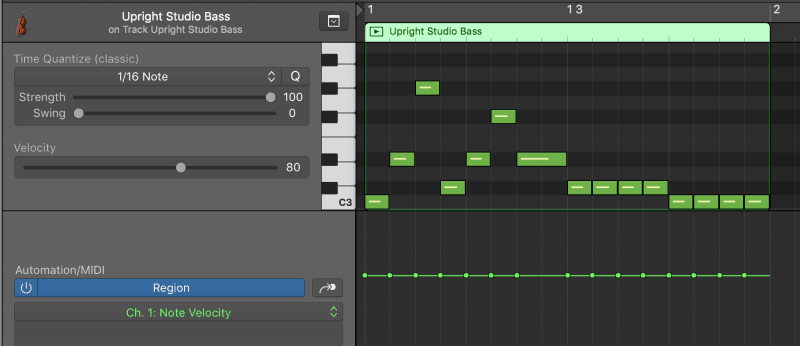
A huge part of MIDI editing is quantizing. Quantizing automatically time-aligns MIDI notes so you don’t have to spend forever dragging them into place.
Quantizing MIDI
If your MIDI notes are out of time, try quantizing them. Select all the notes you want to move and hit Q on your keyboard. When you do, watch the notes snap to the grid.
You can even change the subdivision you want to quantize at. With a part that changes notes quickly, you might want to set the subdivision to 1/32 Note. For a slow part, 1/8 Note might be better.
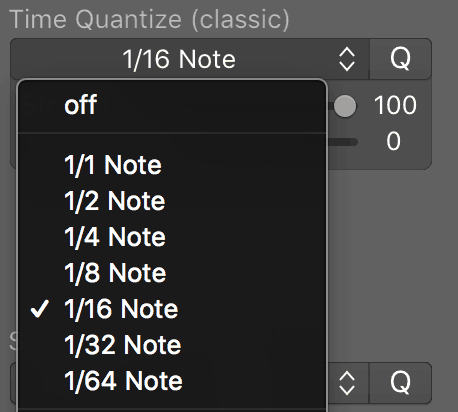
Setting the right note value will make sure your notes snap to the right part of the grid.
Жареный лук «Look»Удобная поджарка для хипстеров
Все чаще стал замечать, что в кафешках тут и там во многие блюда стали обильно подкладывать жареный хрустящий лук: в вареники, картошку, бургеры и прочее, и прочее. Сразу заподозрил — кто-то торгует этим продуктом в оптовых масштабах, и оказался прав.
Нашел этот лук в магазине, и теперь я добавляю его везде: в пельмени, бич-пакеты, макароны, картошку, блины, воду, сок и прочее, и прочее. Выгодность у готового лука в том, что он не воняет на всю округу, как это бывает при жарке — если зовете гостей, это провальный вариант, поскольку среди приятелей могут попасться странные личности, на дух не переносящие жареный лук. А вот я его люблю и всем советую.
В целом, это идеальный вариант для тех, кто не любит пачкать руки и не желает насквозь пропахнуть божественным ароматом лука. Единственный минус — цена, 70 рублей за баночку многим могут показаться неоправданными.
9/10, Владимир Самойлов
Starting a Mix: Panning
Panning instruments around the stereo field is usually the next step after setting basic levels. The concept behind panning is simple: we don’t necessarily have to hear the same thing in both the left and right channels at all times. You can even get really creative with your placement of elements in the stereo field to add interest to your mixes!
Logic Pro X offers three different types of panning.
By right-clicking the panner found above the fader in the mixer window, you’ll open up a box allowing you to select between “stereo pan, the default “balance,” and “binaural pan.” The latter is mostly used for post-production, which we won’t delve into just yet.
Balance is used for mono tracks where we have just a single audio signal. Stereo pan takes into account both channels of audio on your stereo tracks, which can be very useful on, say, a stereo recorded keyboard.
From there, it’s again a matter of moving instruments around to taste! Some more obvious panning moves are left and right rhythm guitars, panning overheads or other percussion left and right, etc.
It’s a matter of experimentation, so jump right in and get panning — it’s fairly self-explanatory once you get started!
Part 8: Making MIDI Sound Realistic
MIDI is an incredible tool, but if you aren’t careful, your MIDI parts can end up sounding robotic.

Fortunately, there are a few tools we can use to make a MIDI instrument sound more like the real thing.
Quantization Strength
While quantization is great for tightening up a performance, it sounds a bit too flawless. After all, a human wouldn’t be able to play every note perfectly on beat. To make quantized MIDI sound more human, you’ll want to turn down the quantization “Strength.”
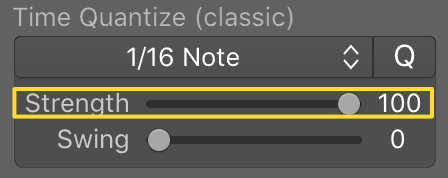
By default, the quantization Strength is set at 100. This means the MIDI notes are 100% on the beat. By turning the Strength down, the notes will still be mostly in time, but won’t be so robotic.
I usually set quantization Strength around 80. If I want a part to sound more loose, I’ll set it somewhere between 50 and 70.
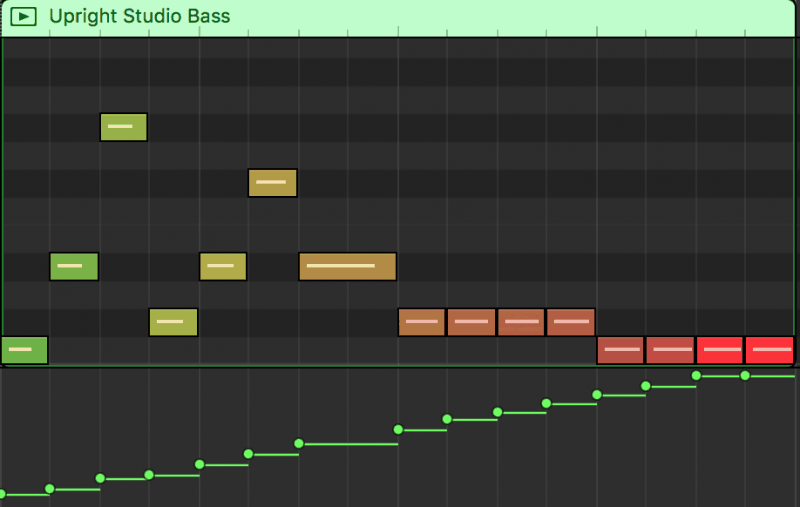
Another crucial part of making realistic MIDI is velocity.
Changing the Velocity of MIDI Notes
Velocity is just a fancy music word for volume. The velocity of a MIDI note determines how loudly and how intensely the MIDI note is played.
The higher the velocity, the louder the note. When playing instruments, people naturally play each note at different velocities.
So to make a MIDI part sound more realistic, it’s super important that we vary the velocity.
There are a couple of different ways to change the velocity of MIDI notes. One is by opening the MIDI Automation Window.
With the Piano Roll selected, press A. You’ll see an automation window open at the bottom of the screen.
This window has a dropdown menu with a ton of things you can automate. For now, we’ll just focus on the “Note Velocity” option.
By clicking and dragging the green bars here, you can change the velocity of your MIDI notes. You can even draw crescendos and decrescendos by drawing a line moving up or down!
This is great for editing a lot of notes at once. If you just want to edit the velocity of a couple notes, select the “Velocity Tool” in the MIDI Editor.
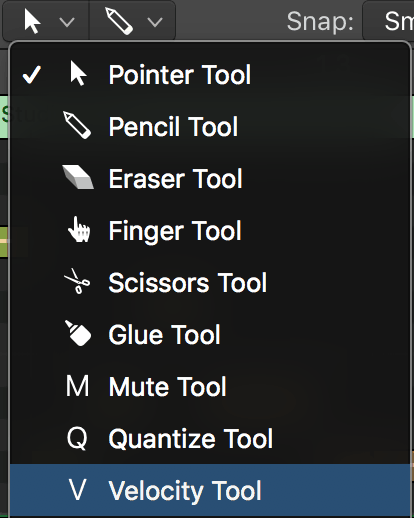
With the Velocity Tool on, drag the note up to increase the velocity or down to decrease it.
Humanization
Humanization automatically makes small changes to the timing and velocity of MIDI notes. To quickly get a realistic sounding performance, humanize your MIDI.
Right click on the MIDI region you want to humanize and scroll down to the MIDI folder. Then go to the MIDI Transform folder and select “Humanize.”
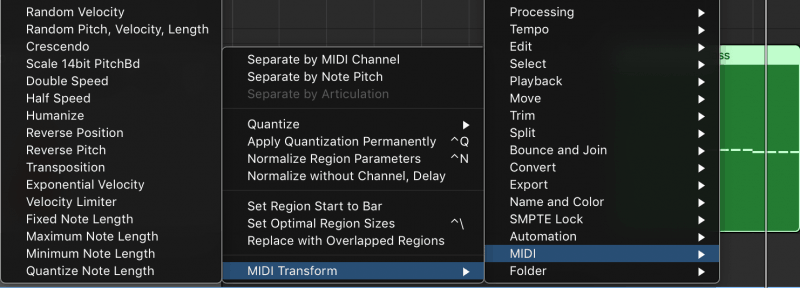
A window should open that looks like this:
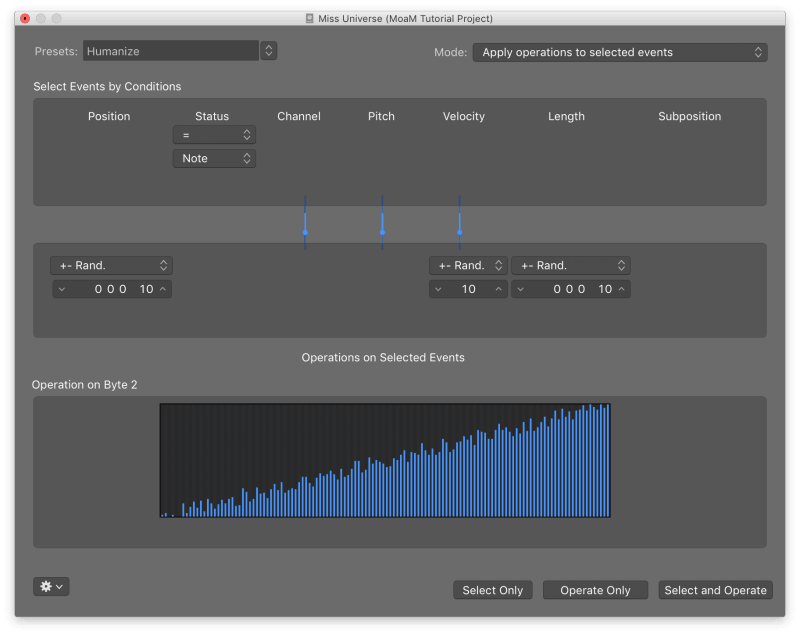
By clicking “Select and Operate” at the bottom right, you’ll humanize your MIDI region.
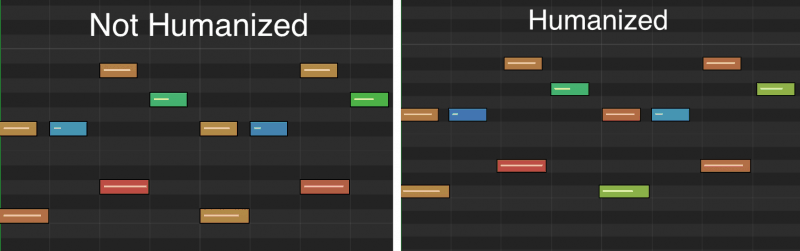
The difference is subtle, but it goes a long way.
Back Where You Belong
I’m embarrassed and annoyed that it took me so long to stumble onto the key command for ‘Move To Original Recording Position’ (Cmd+Click the relevant region, go to ‘Move’, and the key command as configured on your system will be listed there). This one little manoeuvre has since become such a go-to that I actually harbour resentment towards anyone who knew about it and didn’t tell me.
In its most basic function, it can be used when you accidentally move an audio region and aren’t sure where it came from (caffeine addicts like me know what I’m talking about). Or if you’ve been editing audio and realise it all sounded better before you started messing around and want everything back where it was.
But it goes deeper than that. For instance, in the slow-down effect I just spoke about, at the point where you import the audio, instead of putting it between the locators, you can just drop it anywhere and hit this key command, and viola! The region is where it should be.
This is also a great tool when dealing with tracks for video. Now that most post-production people are spoiled by composers sending them one audio track per reel, they are annoyed by the extra work of placing each cue individually. No problem, you can do it for them. Just grab all your mixes, drop them into a new session, engage Move To Original Recording Position and the files will snap into place.
Создание музыки[]
При профессиональном создании музыки с помощью программы можно:
- Исправлять рассогласованные вокальные партии и изменять мелодии записанных дорожек с функцией Flex Pitch.
- Легко управлять размером и темпом любой записи с функцией Flex Time.
- Записывать, добавлять и удалять фрагменты одной или нескольких дорожек.
- Организовывать дубли в папки и легко создавать компиляции с функцией Quick Swipe Comping.
- Мгновенно автоматизировать запись для любой линейки канала и параметра плагина.
- Сочинять и микшировать музыку из любой части комнаты с Logic Remote на iPad.
- 64-разрядная архитектура поддерживает большие проекты, содержащие сотни дорожек и сэмплированных инструментов.

